So Ugly It's Cute

We bought a house. It's ugly as sin right now, but it has so much potential to be cute. We're out to actualize that potential.

Name:
Location: Seattle, Washington, United States

Friday, April 25, 2008

Miscellaneous

Just a few odds and ends...


New baseboards for the kitchen (the old baseboards, painted white);


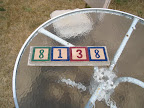
New house numbers, made from tiles we bought in Morocco;

and


Our Summer 2007 garden! We planted 6 types of tomatoes, zucchini, 3 types of squash, chard, and pumpkins. Everything grew well, except the pumpkins. And the spaghetti squash grew a little too well. We had something like 25 of them... and I do not care for spaghetti squash.

New Dog Containment System

When we bought our house, it came complete with one very rusty chainlink fence, surrounding the entire property. Chainlink fences are (1) ugly, and (2) flexible, and therefore not entirely dog-proof. Particularly not dog-proof when said dog can tell that your neighbor has a newly fertilized garden, and uses every opportunity to go roll in that garden and come back smelling like manure. Mmmm.

So, for a while, we used the redneck way of securing the fence -- piling up rocks wherever the dog escaped.

But then summer came, and we started seeing our neighbors again after the long, rainy winter. Seriously, you never see your neighbors over the winter. It's too wet, too cold.

Our neighbors to the north decided to organize a joint fence venture. We wanted a new fence, they wanted a fence to keep their kids in the yard, and the neighbors next to them wanted a bit of privacy, since their windows are approximately 1 foot apart.

So, after soliciting many bids, we settled on Alki Fence -- since they were ridiculous amounts cheaper than any other fence company, and they could get to work right away.

However, we had to take down the old fence before the new one could be built. Doing that required cutting the chainlink off the poles, and then sawing (with a Saws-All and a metal blade) down the metal fence posts.


One roll of rusted chainlink, and Evan contemplating the best way to remove the fence posts.


Sawing down a fence post.


Pile of fence posts and poles at the end of the day.

So, one morning, the fence crew shows up, and quickly, with a power fence-post hole digger, digs all the fence post holes in approximately 5 minutes. A couple of guys follow them, dumping bags of concrete in the holes. Another guy follows them, filling the holes with water and mixing up the concrete. Finally, two guys stick the new fence posts in the holes and make sure they're nice and straight.

Then they go away for a few days.

Our backyard looks like a crucifixion scene for a while, what with all the very tall wooden poles.

Once the concrete set, the fence crew came back. And within a couple of hours - and this amazed me - we had a fence. It took absolutely no time at all to install a fence around 2 quite large yards.


Fence on the north side of the yard.


Fence on the south side of the yard.


Front gate (with my car in the background!)


Front gate, from the front yard.

As you can see, we decided not to fence in the entire yard. I have a strongly held conviction that fencing in the entire yard really cuts you off from your neighborhood, and did not want that again. Also, I didn't want Copper to be able to stand by the sidewalk and harass passers-by.

P.S. - we still have some of the chainlink up in the front yard. We haven't figured out the best way to remove it, since an evergreen bush has grown up around it. A task for this summer!

Putting the Bathroom Back Together, Part 3

Last step in Phase 1 of the Bathroom Renovation was to install the sink and the cabinets.

We bought our sink from Second Use, the used building supply store. We thought we wanted a pedestal sink, but as it turned out, our pipes weren't aligned correctly -- meaning, a pedestal sink (which fits OVER the pipes) would not have lined up with our mirror. So, scrapping that (and returning Sink #1), we went with a wall-mounted sink.

Basically, a wall-mounted sink hooks onto a bracket that has been screwed securely to a stud and/or cross piece behind the drywall. As you'll remember from an early bathroom post, we had to tear apart our wall to install the cross piece. Mudded and painted up, it's like the bracket was always meant to be there.


Bracket in place, aligned with the mirror (but NOT with the pipes).

You slip your sink on top of that (there are little tabs to hold it in place), slap some caulk around where the sink meets the wall, hook up the pipes, and voila! Sink. It's actually really, really easy.

Beforehand, I put a new faucet mechanism in the sink, which was also straightforward: buy a faucet, stick it in the right holes, seal things up with a little plumbers' putty, and voila! Drain.

Next, we installed the cabinets, which bought from Ikea (of course). We decided to go with two tall cabinets on either side of the sink -- each one having an upper and lower cabinet, with an open space in the middle (our "countertop"). Just like our kitchen cabinets, we had to assemble them ourselves, but a box is pretty easy to construct.


Cabinet 1 in place, cabinet 2 almost in place.

We didn't have a whole lot of selection when it came to cabinet doors, but we settled on a particular style we both liked. It's basically a light wood frame, with a translucent plastic insert -- so you can kinda see through them, but not really.


Cabinet door.


New light fixture.

Finally, we installed new door pulls. Now, look at this attention to detail!

and

See that!? The spirals on the door pulls match the spirals on the shower curtain! I'm so crafty like that...

And last but not least... new, white floorboards.


And Phase 1 of the Bathroom Renovation is complete.

Quick blog tip

You'll notice that, in our newest entries, the pictures are a little on the small side. If you click on them, you'll be transported to larger versions of these pictures. This will be the case, going forward.

Putting the Bathroom Back Together, Part 2

Generally, one paints before installing a tile floor, but, as mentioned in the previous post, we really needed our toilet back, so we decided to just deal with painting after the tile had been laid.

What better color to paint a bathroom than Pepto-Bismol pink?!


A rare picture of me, painting the bathroom.


Paint supplies on top of a carefully plastic drop clothed floor.

Now, if you've been paying attention, you know that we originally painted the bathroom gray. We had no choice - the bright blue it had been painted when we moved in was not going to work. We decided to keep the ceiling gray, but painted the walls the new color.


Pink bathroom! From the hallway.


Close up.

You'll notice that we just let paint get all over the tile work. See, those tiles are plastic and really chinzy. The plan is to get rid of them during Phase 2 of the Bathroom Remodel (perhaps coming Summer 2008!), when we redo the tub area.

Ok.

Now I hope you don't think I would *actually* be down with a pink bathroom...

Pink is really the color of the primer that Home Depot sells you, as a base coat for...

a RED bathroom!! Woooo! Brothel-icious! I'd been gunning to paint something in the house red, and the bathroom was the winner.


And I mean BRIGHT lipstick red. Rock. Is that a hip bathroom or what?

After about 20 gazillion coats, we had a bright red bathroom. Upon later research, I learned that a dark gray primer would've cut it down to only about 10 gazillion coats of red paint, but whatever.

Putting the Bathroom Back Together, Part 1

Miss us? So, after several reminders from several people - and one person in particular, *coughcough* - I've decided to make time to get this blog up-to-date. It's no coincidence that the last post was right before I stopped working from home. What? I'm busy! I have a job and a life!

So, no, our bathroom is not still stripped to the drywall and subfloor. Being our only bathroom, we were forced to put it back together, pretty much immediately.

So, while Evan and his dad were ripping the bathroom apart, I sat outside on a beautiful July day, and figured out our new flooring.

We didn't really require much discussion when picking out a new floor for the bathroom. We were both like, "yep, hex tiles," and I suggested maybe a cool pattern. We decided that white tiles, with black tiles placed seemingly randomly (but not really!), would look really nice.

One drawback - hex tile sheets don't really come pre-made with cool patterns, such as ours. Instead, you get to carefully cut out individual tiles from one sheet, and replace them with tiles cut from other sheets!
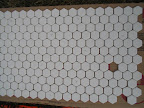

A white sheet of hex tiles in the process of being altered to our pattern. You can see all the penciled-in x's on tiles that are to be removed. Note my attention to detail! Never does the pattern get screwed up!
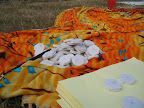

Pile o' misfit hex tiles.

HOURS later, after destroying the bathroom, carefully measuring the room, x'ing and cutting tiles, and laying the sheets out just so, the floor begins to take shape:
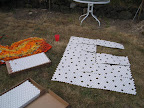

Not tiling the backyard, though that grass is awfully ugly...
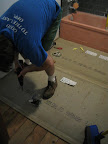

In the bathroom, Evan lays down the cement board to which the tiles will be cemented.
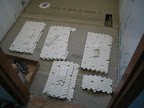

Sheets of tile stacked in the order they need to be installed. Points to me for not screwing up the pattern here either! Note, no black tiles - they are in a bucket, waiting to be carefully placed in their holes, once the larger sheets are cemented down.

And then a bunch of stuff happens. I don't have pictures, because tiling a floor requires two people to move very quickly. No time to whip out the camera!

To recap:
We mixed tiling cement in a bucket. Using a cement trowel, we glooped the cement on the floor (technical term, there), spread it out, and then dragged the jagged edge of the trowel through the cement to create ridges. These ridges grip the tiles better (don't ask me why). Then, we'd take a sheet of tiles from the correct pile, carefully lay it on the cement so as to avoid cement squishing up and over the tile, and then pop the black tiles in place. And repeat.

Once everything was down, and dried, we mixed the grout up, and using a different, rubber, trowel, spread the grout over the tiles, pushing it into the spaces between the tiles.

Then, we deviated from procedure -- you're supposed to wait, like, 3 days before doing anything to the floor, such as sealing the grout or putting heavy things on the floor. But, by this time, it's Monday morning and we haven't had a toilet since early Saturday morning. Thankfully, we have really generous neighbors who let us use theirs all weekend, but we really needed our own at this point.

So, we jump out of bed early Monday and install a toilet! Toilet installation goes a lot faster than you'd think. Maybe half an hour?

So, you install the bracket, and the wax ring and screws, and carefully seat the bottom of the toilet on top of all of that.
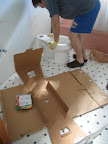

Evan, seating the toilet. Look at the floor!

Then, you screw the bottom of the toilet to the bracket (NOT to the floor), and screw on the tank. After that, you hook up the water valves, turn on the water, and voila! Tank fills with water, and you can pee again.
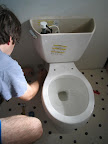

Evan, hooking up the water to the toilet.

Other things I don't have pictures of: finished floor, fully installed toilet, the toilet seat (which you have to buy separately), the grout on the floor getting all dirty because we put things in and used the bathroom PRIOR to sealing the grout...

Yeah... white grout? Not a good call. We did seal the floor when it was time, but by then, the grout had already slightly discolored. Something to take care of in the future.